Click on any card to enlarge.
January
 February
 March
March
April

May

June


July

August
 September
September October


November
December
February March September 


 This card and the one below were done following the sketch at

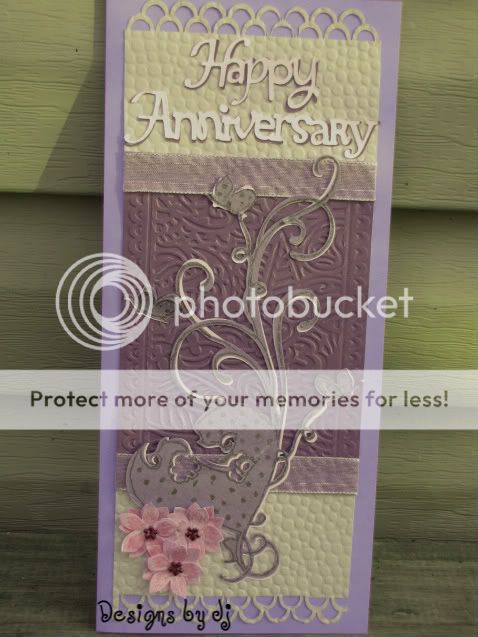

 The sentiment on the front of the card and here is something I came up with on my own. It's what I think many people feel about quilts. And since beauty and health don't last forever, I would hope this is how we would feel about our mate as the years go by.
 I actually made this card the end of September, but I've not posted it yet. I made it for my daughter and son (in-law) for their 9th anniversary. My daughter really likes quilts, and this is supposed to look like a bargello quilt. I'm not real pleased with it because I feel that I made the strips a little too large. I didn't use Cricut, but did use Cuttlebug to emboss some of the paper. I like to add scriptures to the back of my cards, and have done so for over 20 years. I try to pick ones that work with the occasion. And I thought this was very appropriate.
This is my latest creation. It was for a dear friend who lost his wife of 50 years. Since Polka Doodles challenge was for a card for a male this past week, I thought I would enter it there also. However, I had my days mixed up, and didn't meet their deadline. Oh well, there will continue to be challenges; giving comfort to our friends is the most important thing. The stamp was from Heartfelt Creations, that I colored with Prismacolor pencils and then used Gamsol to shade and blend the colors. The frames were cut from Storybook and then topped with three brads. The sentiment was a stamp that was cut out, glued to another paper and cut out again before being glued down.


This is the first card I've ever made for my husband in 37 years of marriage, even though I've been making cards for more than 20 years. I guess I never thought I could make one as nice as I could buy. However, I thought about it and realized that even a plain or simple card would mean more when it's made to express the way we feel. So here is the card to my Knight in Shining Armor. Physically and mentally he has protected me from any dragon that has come our way. The card began with the paper from DCWV "Once Upon a Time". With that in mind, I used Storybook to make the sentiment on the front and inside left page of the card. On the inside right I used Sweethearts. The sentiment in the circle on the front is made with the font "Bard". Of course, the card had to be dressed up with inking and ribbon, etc. The quote on the back from "Time in a Bottle" has been one of my favorites for years. I figure he will now expect me to make his cards, so I guess I need to start thinking about the one for next year. LOL!


 Now that I'm through with the baby invitations and favors for my friend's baby shower, I've had time to get my card done. I wanted to do a tri-shutter card so I could use several baby elements. I, of course, used the NA cart. I love giraffes, so I thought that would be my largest animal. (You might remember I did an elephant for the invitations.) I love, love, love my CDS now. It's so nice to only have to cut out the elements you want in one color, instead of having to cut them all out two or three times to get all the little pieces in different colors. (Sorry - if you don't have Cricut Design Studio you may not know what I mean.)

This is a card that a friend asked me to do. She had admired my cards, and wanted me to do one to give to a friend. She wanted something bright and cheerful. So I did one with some of the elements I had done in a previous card. I added the fence to this one. The tulips and other flowers are from WIMG and the grass is from PS. I stamped the birds and the tree limbs, and then added to them with markers and gel pens. The butterflies and dragonfly are punches.


These are the first invitations that I've made with my Cricut. It was a bit of a challenge making 50; they definitely took much more time than ones I've done using computer software. But there was a wonderful sense of accomplishment. It took me several days to design, pick out paper, cut my items, ink and then put everything together. The elephant is from NA. The elements used were the elephant's body, head, parts and shadows. The head was pop-dotted and then decorated with gel pens and googly eyes. The information and sentiments inside and on the back were computer generated.

This lady is from the NA cartridge. She has been cut at approximately 11-1/2". She's been cut out two or three times using light cardboard from the back of some of the paper packs I bought. Then of course, I did her clothes, hair, etc. I used ribbon on her hat and dress and then bling on her neck, arm and handbag. I made her in CDS, which made it so nice to be able to cut out her hair, dress, slacks and other items from just the designer paper I wanted. I made a stand for the back, so she would stand up on the table. If I do her again for someone else, I would want to make one for each table. She was on her own on the cake table.

Here are my first, but definitely not last, sour cream favors. I couldn't believe how easy they were. I saw a video a few weeks ago, but can't remember who it was by, it wasn't the one by Dawn. This lady used Zig two-way glue instead of super tacky tape. She said this worked better for her, and I could see the sense of that. However, the Zig glue didn't quite hold them together as well as I wanted, so I used some K&Company, Quick Dry Craft Glue (which is a thick white glue) and that worked beautifully.
I also didn't glue the three sides in the beginning as the tutorial suggested. I glued the short ends together to make the tubes. Then, when I was ready I used a tooth pick to apply the glue, to one end, crimp; add the candy; and then again on the other end and crimp closed. After they were dry I added the circle tags to each one, which were computer generated. I also changed the size somewhat from what is on the tutorial; when using 12"x12" paper. Most of the tutorials call for 4-1/4"x5-1/5" paper, which is great for 8-1/2"x11" paper, but I feel it is wasteful for 12"x12" paper; so I cut them at 4"x6" and got six instead of just four, and there was no wasted paper and they don't look that much smaller.
 It seems that I've had way too many sympathy cards to do this year. It never gets any easier. The only thing I keep in mind is that hopefully I'm giving a moment of comfort to the recipient. At the time I'm sure they aren't really even thinking about cards. It's later when things have settled down that the person finds the time to look over the cards and that's when we can only hope and pray that we've said just what they need to hear at the right time. We also must put ourselves in the other person's shoes, even if we haven't lost a loved one, because as sure as the sun comes up, one day we will be the ones on the receiving end.


This card was for my dh's boss. His mother had been ill for a number of years. He and his wife would make several trips to visit with her. I met her about 35 years ago. She lived in NJ in a large old home that has many of its original doors, knobs and wavy glass. It's a shame that so many young people don't want to preserve some of the things from the past. Of course, things weren't as energy efficient as they are now, but there sure were some lovely items. I've got to work on my craft/sewing room soon, and I think it would be wonderful to have some old doors to make desks or tables out of.
The card is similar to what I saw another member do. I've always thought the sanding of white core paper was a nice affect, so this is my first attempt at it. I wanted to use more masculine colors and I think these were just right. I didn't want to put any "bling" on the card, but it needed something else, so I cut out three buttons from some embossed cardstock. The card was finished off with a few very crooked lines around the card. (I know, you're not supposed to expose your mistakes, but I know these jump out off the card.) Lol.

This card was one of two requested by one of my dd's. She had two friends she wanted to show her appreciation to. This one she requested with animal print because the friend uses it in her home. Wouldn't you know that I could find none in our small town? We do have a M's, but they're not as large as they are in some cities. I finally thought to see if anyone had any tissue paper, and this is what I found. Of course, I never thought that since it was so thin that I'd have to glue sheets together. I finally used vellum tape and that seemed to work. The zebra is one from a set of wild animals I got at M's for $2. So I cut him out two or three times, and pop-dotted him. It seems like I'm not through until I've inked the paper and added a little bling and doodling.

